| ui-tab |
|---|
|
| Anchor |
|---|
navtop | navtop | Basic Navigation
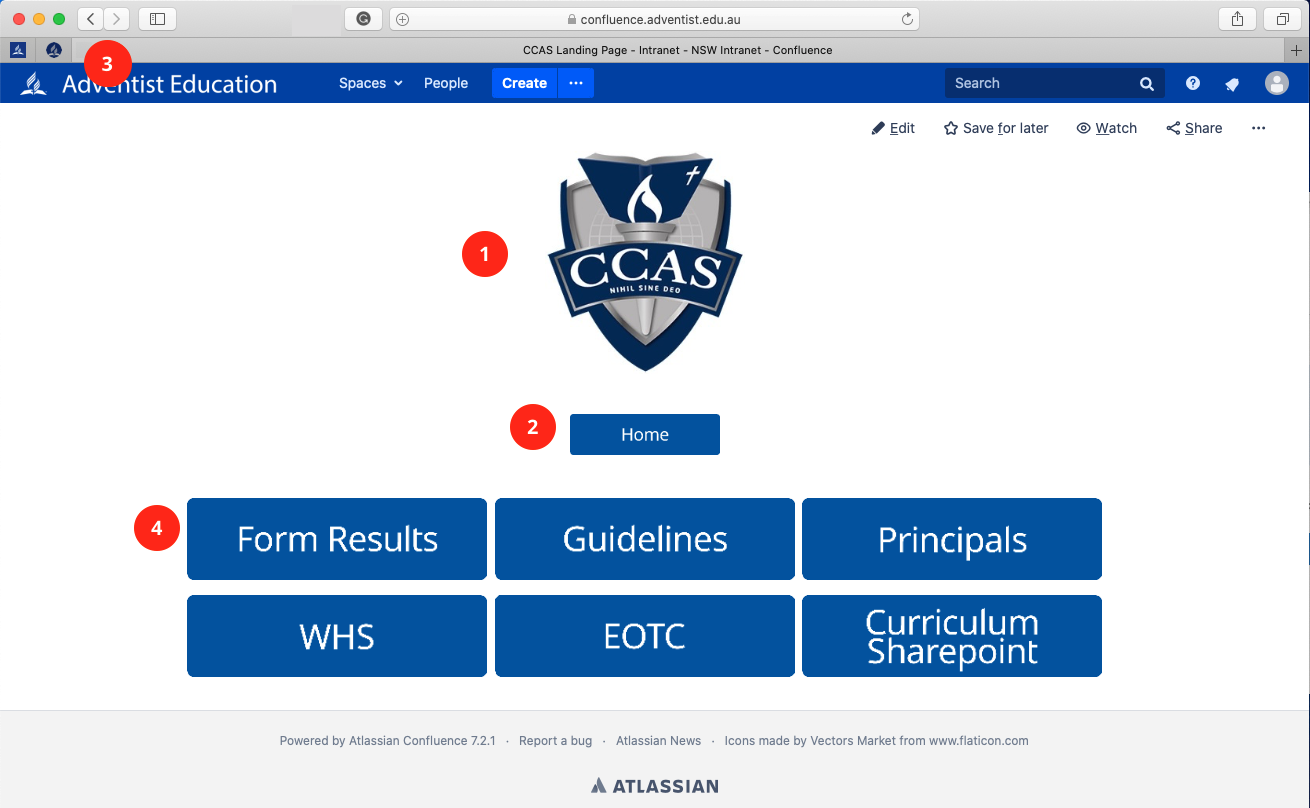 Image Removed
Jump to:
1 | 2 | 3 | 4
ui-| steps |
|---|
| UI Step |
|---|
| Anchor |
|---|
nav1 |
|---|
nav1 | The Logo/Heading lets you know what area you are in, School, Conference, RAC, EOTC etc. Click on the logo to return to the landing page of the area you are in, e.g. School Page, Conference Page, WHS Page.| Widget Connector |
|---|
| width | 852 |
|---|
| url | https://www.youtube.com/watch?v=RwS6jkNtD0s&list=PLNwRMtg_E51oVpyMJSoaazV_WqP8veDoi&index=10 |
|---|
| height | 480 |
|---|
|
| Widget Connector |
|---|
| width | 852 |
|---|
| url | https://www.youtube.com/watch?v=3A5Tw-6aVIc&list=PLNwRMtg_E51oVpyMJSoaazV_WqP8veDoi&index=12 |
|---|
| height | 480 |
|---|
|
back to top | UI Step |
|---|
| Anchor |
|---|
nav2 | nav2 | Click on the Home button to return to the main intranet landing page.| Widget Connector |
|---|
| width | 852 |
|---|
| url | https://www.youtube.com/watch?v=vs9aIxrUkto&list=PLNwRMtg_E51oVpyMJSoaazV_WqP8veDoi&index=9 |
|---|
| height | 480 |
|---|
|
back to top | UI Step |
|---|
| Anchor |
|---|
nav3 | nav3 | User your browser buttons to navigate back and forth between recently visited pages| Widget Connector |
|---|
| width | 852 |
|---|
| url | https://www.youtube.com/watch?v=UMLn2pQyz1w&list=PLNwRMtg_E51oVpyMJSoaazV_WqP8veDoi&index=20 |
|---|
| height | 480 |
|---|
|
back to top | UI Step |
|---|
| Anchor |
|---|
nav4 | nav4 | Use these buttons to navigate to areas with your landing page| Widget Connector |
|---|
| width | 852 |
|---|
| url | https://www.youtube.com/watch?v=9GkL_e5fPWs&list=PLNwRMtg_E51oVpyMJSoaazV_WqP8veDoi&index=14 |
|---|
| height | 480 |
|---|
|
back to top
|
| UI Tab |
|---|
| title | School's Guideline Page |
|---|
|
| Anchor |
|---|
guidetop | guidetop | School's Guideline Page
| UI Steps |
|---|
To access your school guidelines, click of the Guidelines button on your school's landing page.
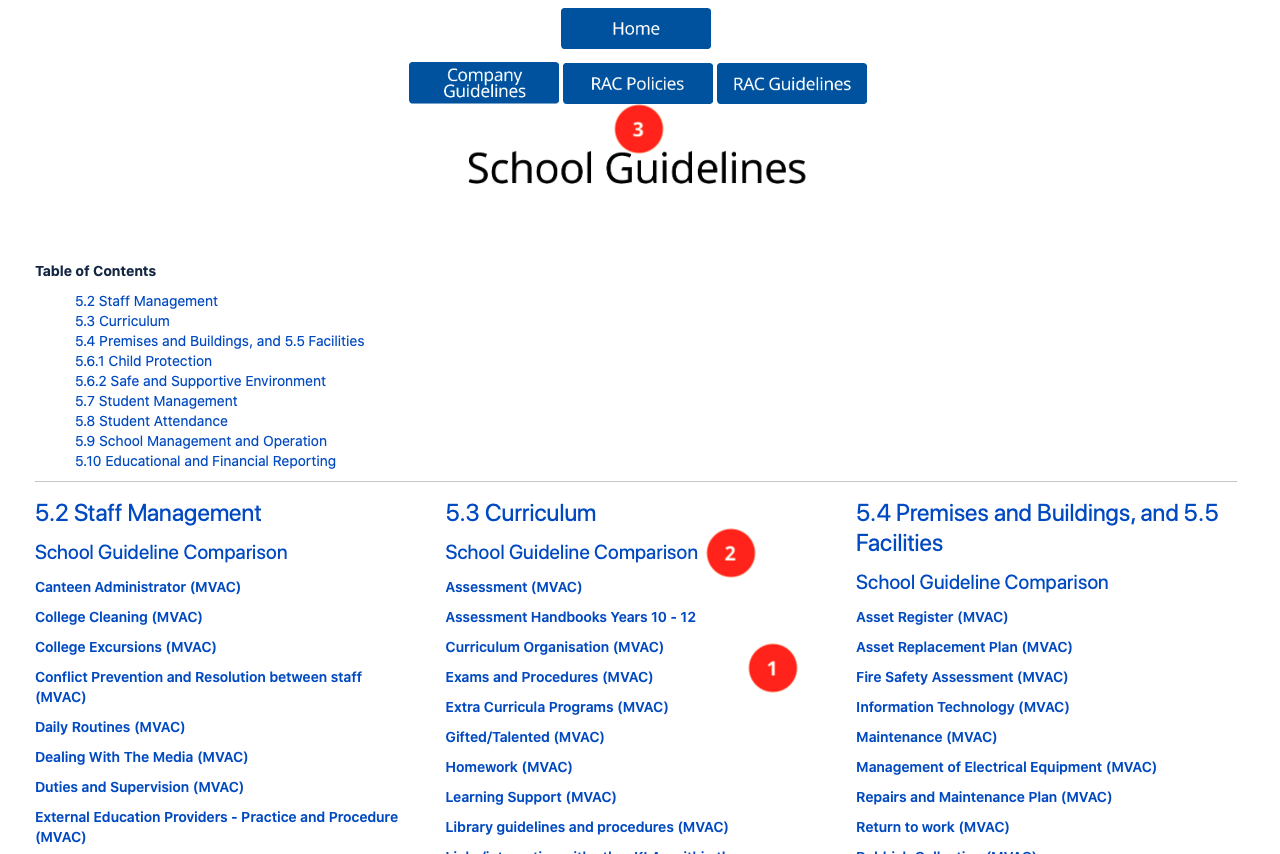 Image Removed
Jump to:
| UI Step |
|---|
| Anchor |
|---|
guide1 | guide1 | Located here are all your school's guidelines. They have separated into the NESA registration areas. Click on one to open, cmd + Click (Mac) or Ctrl + click (Windows) top open in a new tab.Click on NESA Registration Requirements area you are wanting to create the new Guideline in. This will take you to your school's area for this requirement. 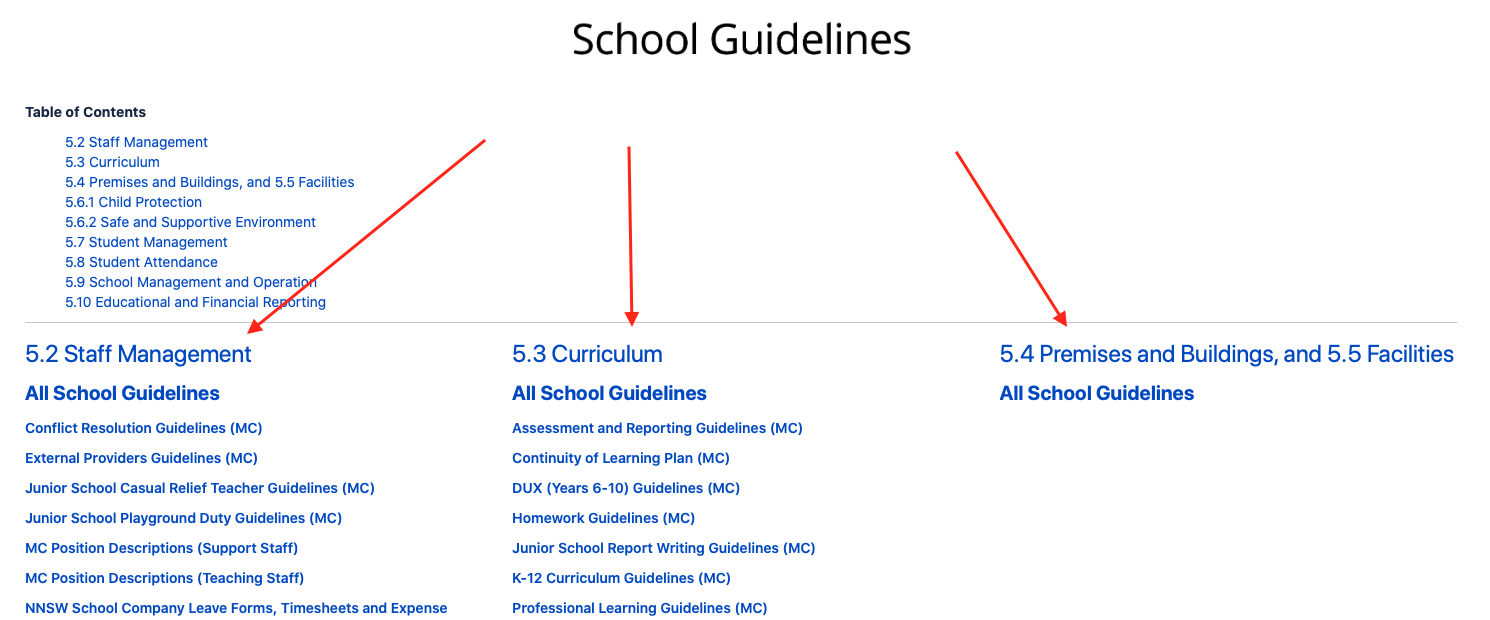 Image Added Image Added
|
| UI Step |
|---|
When in the correct area, click on the three dots next to Create. This allows you to create a page from a template. Each School have a pre-setup template with their logo embedded.  Image Added Image Added
|
| UI Step |
|---|
Look for your School's Policy Content Page i.e. "Policy Content Page (BCC)" (This uses the ASA abbreviations). Click on your School and choose "Create" 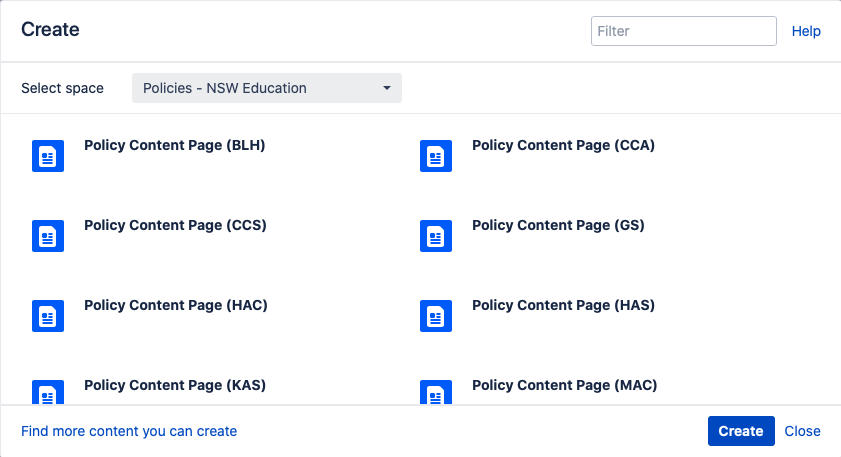 Image Added Image Added
|
| UI Step |
|---|
Provide a Page title that describes the guideline being created, making sure it ends with your school abbreviation in brackets i.e Guideline Title (CCS)  Image Added Image Added
|
| UI Step |
|---|
Insert your content in the space marked "1. YOUR CONTENT GOES HERE.." | Info |
|---|
Don't remove any of the other areas on pages this can alter the way the page looks. The numbers will automatically happen in the "1. YOUR CONTENT GOES HERE.." area
|
If you have a pre-existing document or using another school's guideline as a template, copy the contents of the document and paste it in the space marked "1. YOUR CONTENT GOES HERE.." 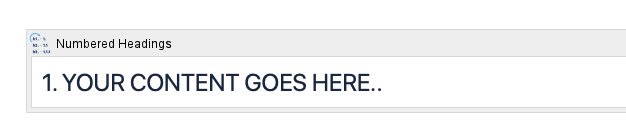 Image Added Image Added
Make sure that any headings have copied over if not use the formatting section in the top left. This will let the table of contents show the correct heading for quick access. 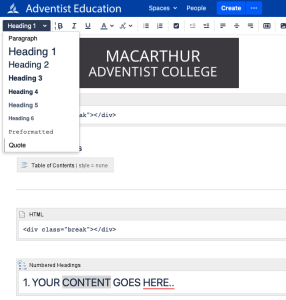 Image Added Image Added
|
| UI Step |
|---|
Save the page with the "Publish" button on the bottom of the page. 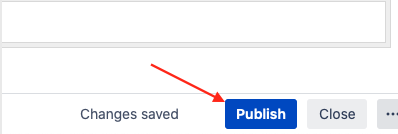 Image Added Image Added
If you want to discard the page click the 3 dot and then Delete unpublished page 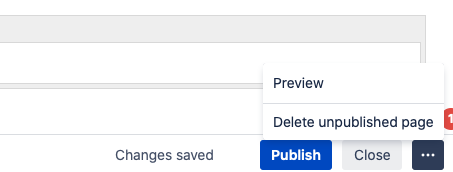 Image Added Image Added
|
|
| Widget Connector |
|---|
| width | 852 |
|---|
| url | https://www.youtube.com/watch?v=3EPuJx6jbIc&list=PLNwRMtg_E51oVpyMJSoaazV_WqP8veDoi&index=7 |
|---|
| height | 480 |
|---|
|
back to top
| UI Step |
|---|
| Anchor |
|---|
guide2 | guide2 | The School Guideline Comparison takes to a page that lists all the NSW Schools Guideline for the selected NESA registration area. The full list of school comparison pages can be in RAC - Landing Page. Image Removed
| Widget Connector |
|---|
| width | 852 |
|---|
| url | https://www.youtube.com/watch?v=yBVJIBiPAo4&list=PLNwRMtg_E51oVpyMJSoaazV_WqP8veDoi&index=4 |
|---|
| height | 480 |
|---|
|
back to top
| UI Step |
|---|
| Anchor |
|---|
guide3 | guide3 | These buttons offer quick links to the School Company's Guidelines, RAC Polices and RAC Guidelines| Widget Connector |
|---|
| width | 852 |
|---|
| url | https://www.youtube.com/watch?v=BCztoSlvyBI&list=PLNwRMtg_E51oVpyMJSoaazV_WqP8veDoi&index=8 |
|---|
| height | 480 |
|---|
|
back to top
| UI Tab |
|---|
|
| Anchor |
|---|
whstop | whstop | Jump to:
| Anchor |
|---|
whs | whs | School's WHS Page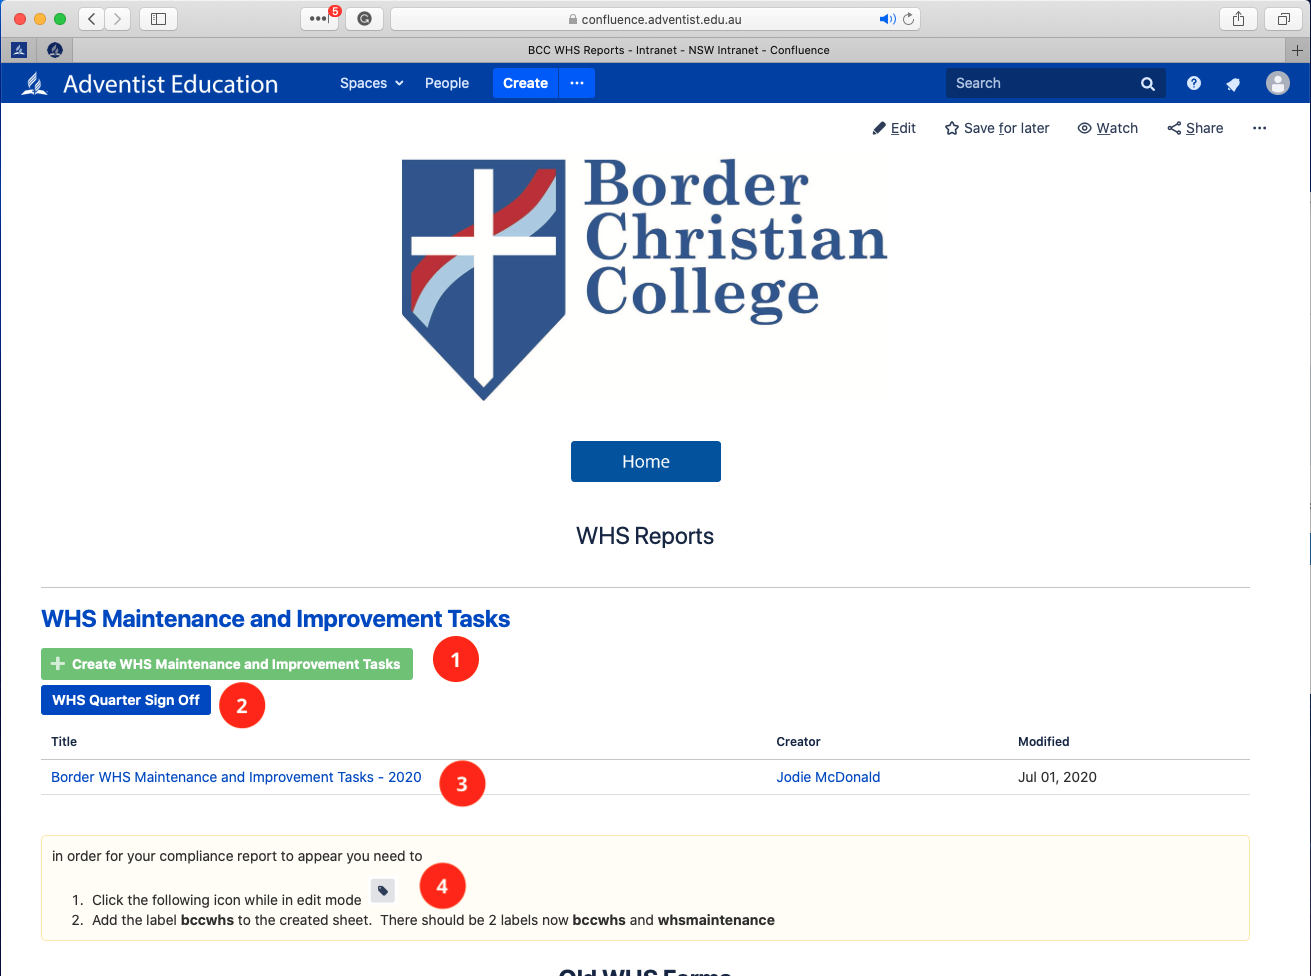 Image Removed
| UI Steps |
|---|
| UI Step |
|---|
Click here to create a new Yearly WHS Maintenance and Improve Task page. Refer to the WHS Task Page for more information. |
| UI Step |
|---|
Click here to sign off on each quarter. This form is required to be submitted after the WHS Maintenance, and Improvements Tasks have been completed for the corresponding quarter. 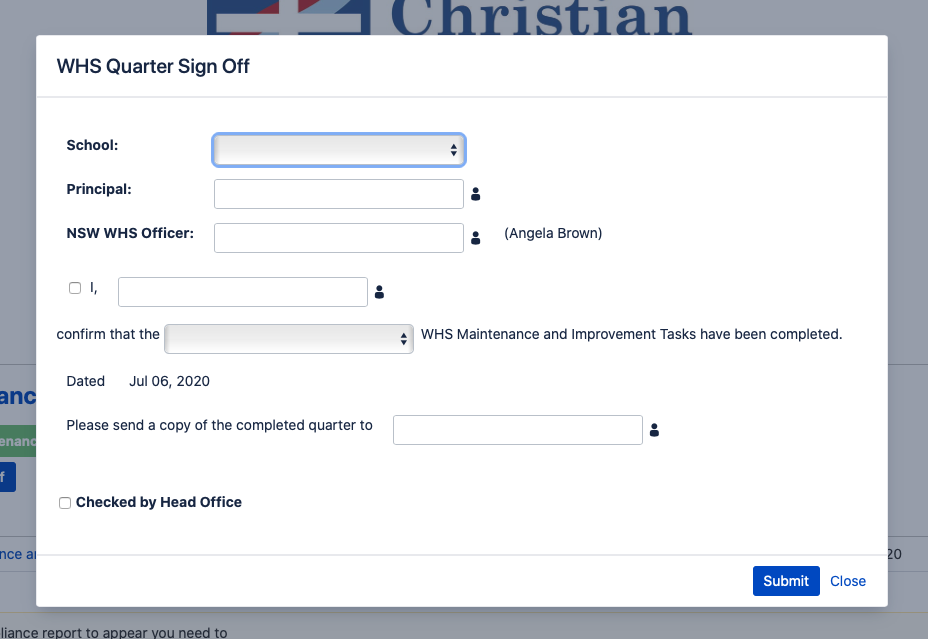 Image Removed Image Removed
|
| UI Step |
|---|
This lists all the past and current WHS Maintenance and Improvement task pages. Click on one to open, cmd + Click (Mac) or Ctrl + click (Windows) top open in a new tab. | Widget Connector |
|---|
| width | 852 |
|---|
| url | https://www.youtube.com/watch?v=05GpC2HuqL8&list=PLNwRMtg_E51oVpyMJSoaazV_WqP8veDoi&index=5 |
|---|
| height | 480 |
|---|
|
|
| UI Step |
|---|
These labels MUST be added to a newly created page for the page to appear on the list above. |
back to top
| Anchor |
|---|
whstask | whstask | WHS Maintenance and Improvement Tasks Page| UI Steps |
|---|
| UI Step |
|---|
When creating a new WHS task list enter the year of the WHS tasks being completed.
 Image Removed
Then click on the label icon
 Image Removed
and add the label that is relevant for your school. This found on your school's WHS page
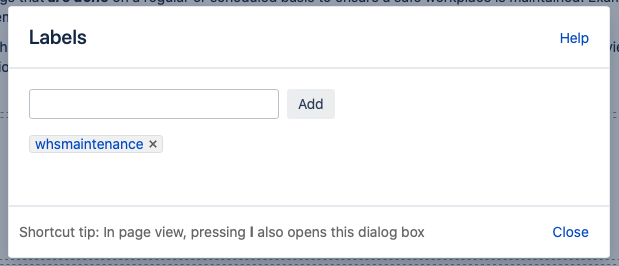 Image Removed
Click publish to save your page
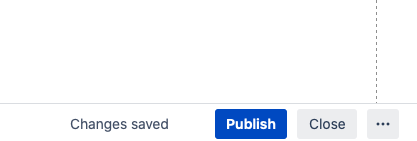 Image Removed
| Widget Connector |
|---|
| width | 852 |
|---|
| url | https://www.youtube.com/watch?v=U5tcD8IYVog&list=PLNwRMtg_E51oVpyMJSoaazV_WqP8veDoi&index=15 |
|---|
| height | 480 |
|---|
|
| UI Step |
|---|
Refer the following video for you to use this form. | Widget Connector |
|---|
| width | 1028 |
|---|
| url | https://www.youtube.com/watch?v=7WQW_aBtheg&feature=youtu.be |
|---|
| height | 720 |
|---|
|
|
back to top
| UI Tab |
|---|
|
| Anchor |
|---|
principaltop | principaltop | Jump to:
| Anchor |
|---|
principalarea | principalarea | Principal's Area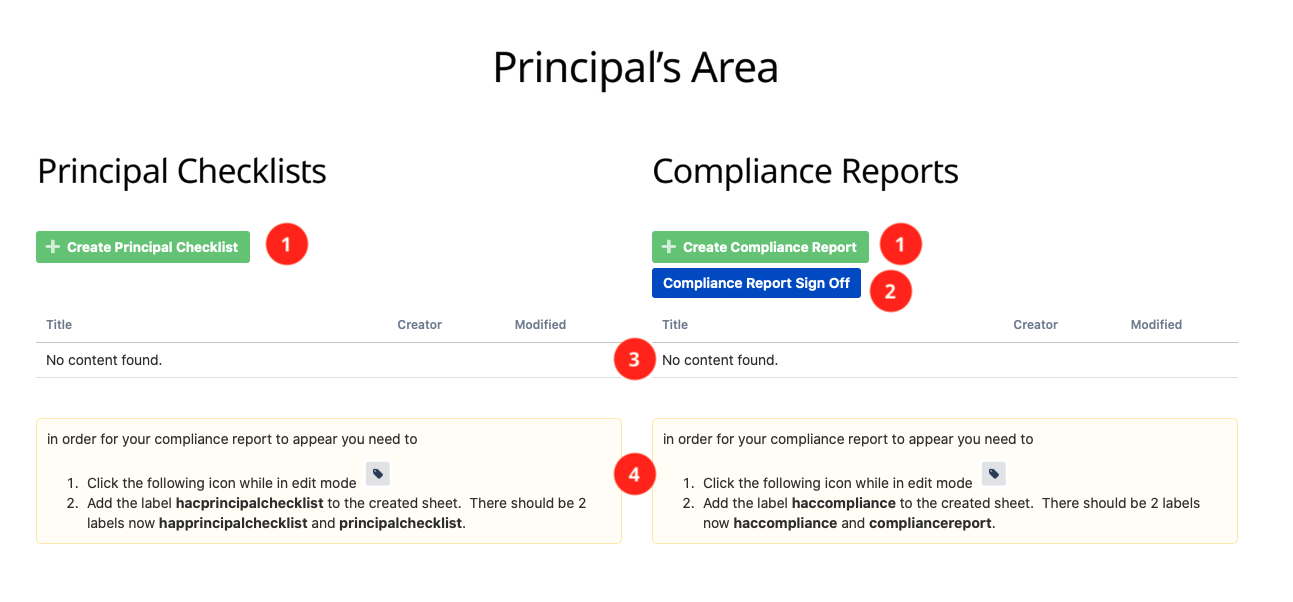 Image Removed
| UI Steps |
|---|
| UI Step |
|---|
Click here to sign off on each reporting period. This form is required to be submitted after the Compliance Report has been completed.
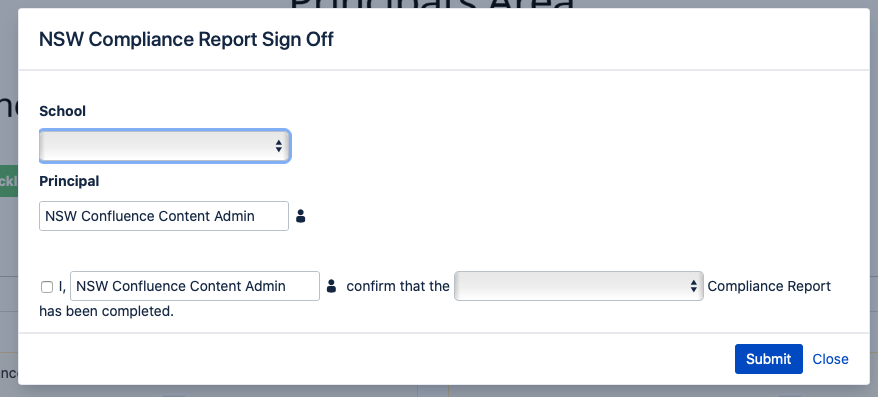 Image Removed
| UI Step |
|---|
This lists all the past and current Principal Checklist/Compliance Report pages. Click on one to open, cmd + Click (Mac) or Ctrl + click (Windows) top open in a new tab.
| Widget Connector |
|---|
| width | 852 |
|---|
| url | https://www.youtube.com/watch?v=HCyJO5UGaaA&list=PLNwRMtg_E51oVpyMJSoaazV_WqP8veDoi&index=11 |
|---|
| height | 480 |
|---|
|
| UI Step |
|---|
These labels MUST be added to a newly created page for the page to appear on the list above. |
back to top
| Anchor |
|---|
principalchecklist | principalchecklist | Principal Checklist PageThis Principal checklist has been created by RAC and may be updated at the start of each year.
| UI Steps |
|---|
| UI Step |
|---|
When creating a new Principal Checklist Page enter the year of the checklist.
 Image Removed
and then click on the label icon
 Image Removed
and add the label that is relevant for your school. This found on your Principal's page
 Image Removed
Click publish to save your page
Image Removed
| Widget Connector |
|---|
| width | 852 |
|---|
| url | https://www.youtube.com/watch?v=U84cwnVGkps&list=PLNwRMtg_E51oVpyMJSoaazV_WqP8veDoi&index=17 |
|---|
| height | 480 |
|---|
|
| UI Step |
|---|
To edit the checklist just click on check box for the task completed. No need to click edit as the page saves the checkbox like a to do list.
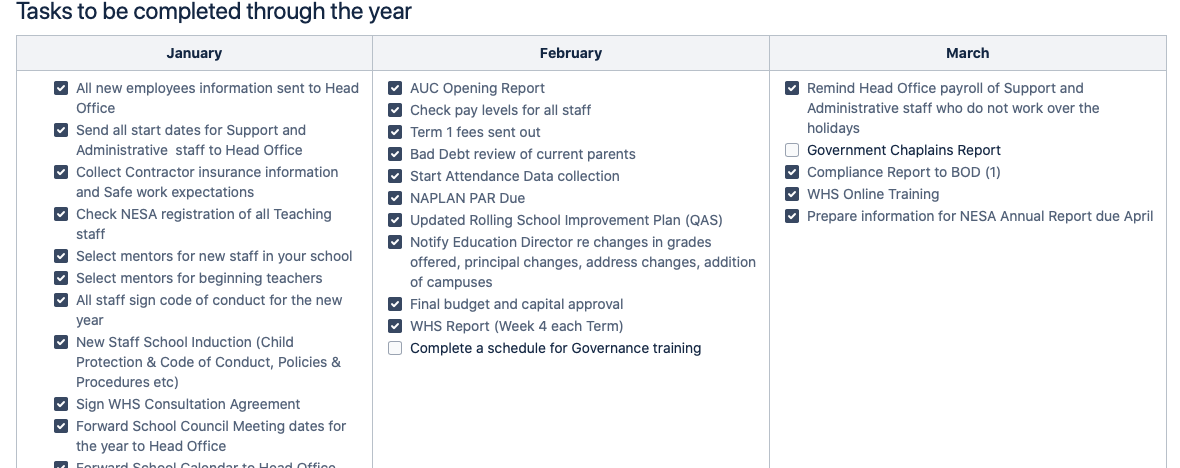 Image Removed
| Widget Connector |
|---|
| width | 852 |
|---|
| url | https://www.youtube.com/watch?v=wTU53IEnDJI&list=PLNwRMtg_E51oVpyMJSoaazV_WqP8veDoi&index=2 |
|---|
| height | 480 |
|---|
|
| UI Step |
|---|
If a task is irrelevant for you school,
click on the edit button
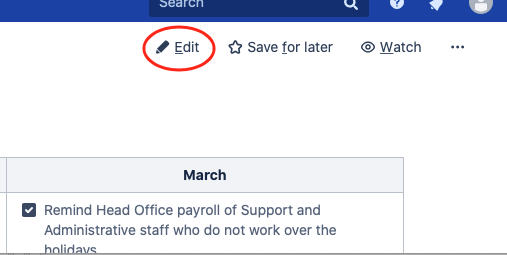 Image Removed
Highlight the task and then select Stirkethrough
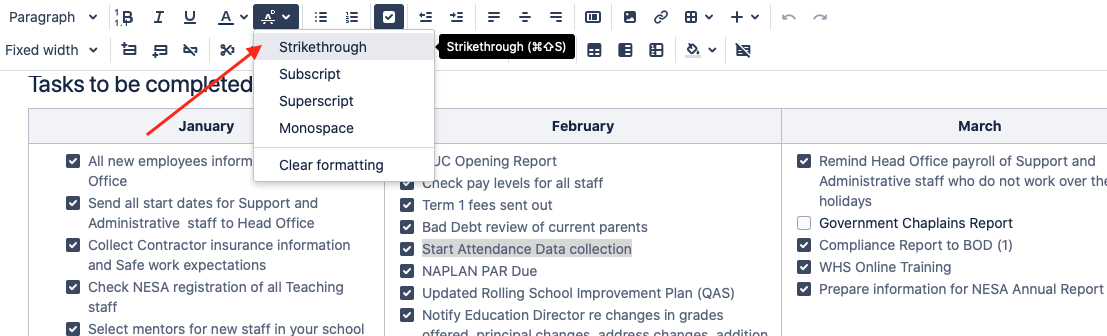 Image Removed
Once finished just click Update to save your changes
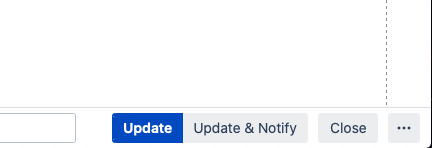 Image Removed
Final result will look like this
 Image Removed
| Widget Connector |
|---|
| width | 852 |
|---|
| url | https://www.youtube.com/watch?v=7B_1OdTW4_k&list=PLNwRMtg_E51oVpyMJSoaazV_WqP8veDoi&index=3 |
|---|
| height | 480 |
|---|
|
| UI Step |
|---|
To add a task to the list
click on the edit button
Image Removed
Click at end of the last task in the month you want to create your task and press enter
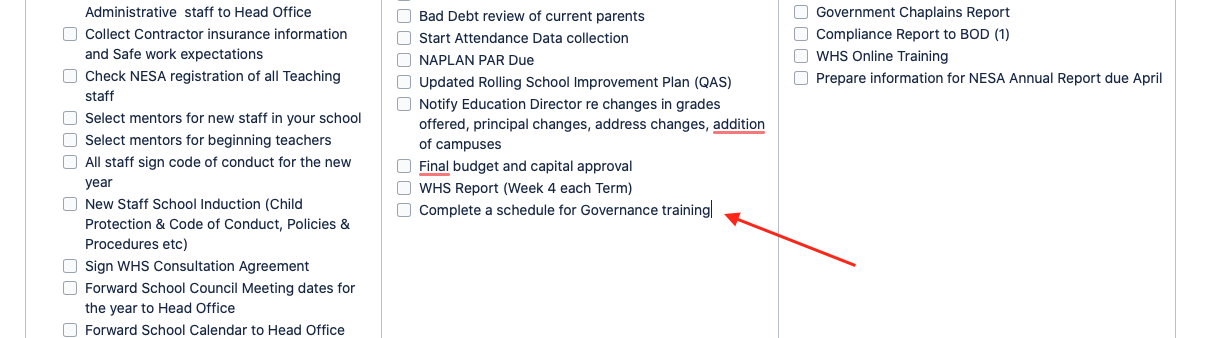 Image Removed
Type your new task in the new line
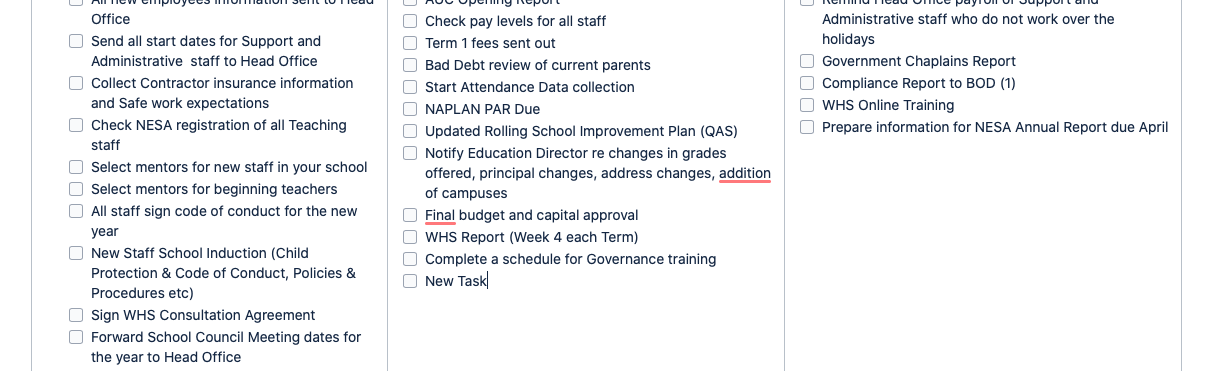 Image Removed
Once finished just click Update to save your changes
Image Removed
| Widget Connector |
|---|
| width | 852 |
|---|
| url | https://www.youtube.com/watch?v=Pe3b_Ccboy4&list=PLNwRMtg_E51oVpyMJSoaazV_WqP8veDoi&index=13 |
|---|
| height | 480 |
|---|
|
back to top
| Anchor |
|---|
principalcompliance | principalcompliance | Compliance Checklist Page| UI Steps |
|---|
| UI Step |
|---|
When creating a new Compliance Report Checklist Page enter the Term and Year of the report.
 Image Removed
and then click on the label icon
 Image Removed
and add the label that is relevant for your school. This found on your Principal's page.
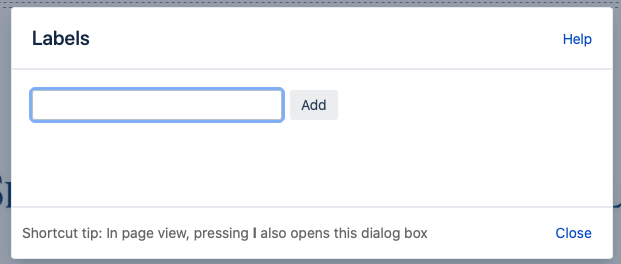 Image Removed
It would also be a good idea to fill in this information, apart from the date, as this should be date of completion.
 Image Removed
Click publish to save your page
Image Removed
| Widget Connector |
|---|
| width | 852 |
|---|
| url | https://www.youtube.com/watch?v=-3Lui5G3dU4&list=PLNwRMtg_E51oVpyMJSoaazV_WqP8veDoi&index=16 |
|---|
| height | 480 |
|---|
|
| UI Step |
|---|
To complete questions in each of the 10 compliance sections just click on either the yes or no boxes. No need to click edit as the page saves the checkbox like a to do list.
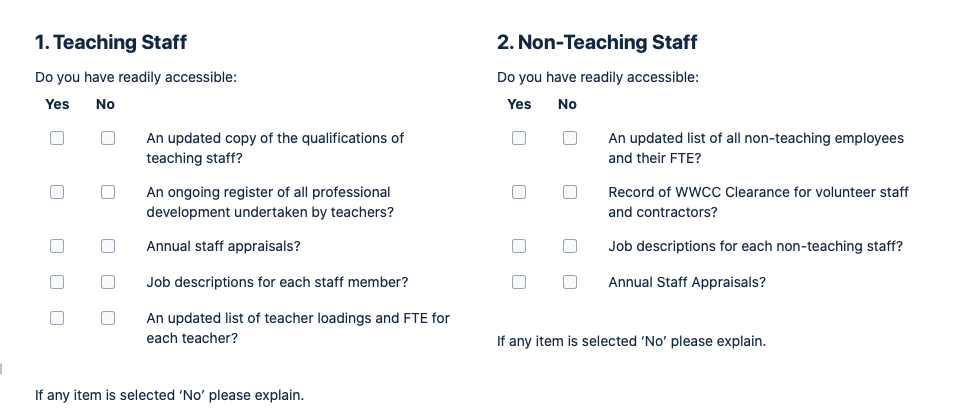 Image Removed
| Widget Connector |
|---|
| width | 852 |
|---|
| url | https://www.youtube.com/watch?v=8zE9uC-WQxo&list=PLNwRMtg_E51oVpyMJSoaazV_WqP8veDoi&index=1 |
|---|
| height | 480 |
|---|
|
| UI Step |
|---|
If the answer was no to any of the compliance questions or need to answer the top question in the report
click on the edit button
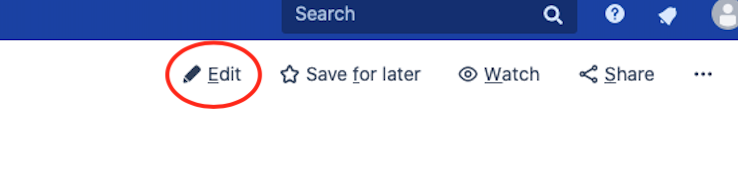 Image Removed
Scroll to the area to need to answer and type your answer in the type text here area
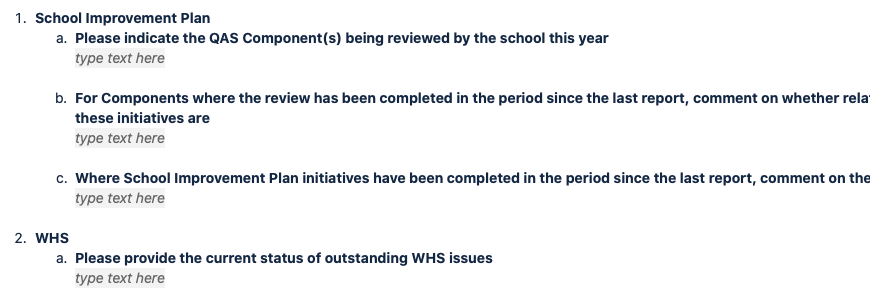 Image Removed
Once finished just click Update to save your changes
Image Removed
| Widget Connector |
|---|
| width | 852 |
|---|
| url | https://www.youtube.com/watch?v=WfOLpUcxSqo&list=PLNwRMtg_E51oVpyMJSoaazV_WqP8veDoi&index=6 |
|---|
| height | 480 |
|---|
|
back to top
| UI Tab |
|---|
|
| Anchor |
|---|
| eotctop | eotctop | Jump to:| Anchor |
|---|
createeotc | createeotc | Creating an EOTCNavigate to your school page and click on the EOTC button
 Image Removed
This will take you to the following page, click on the relevant button for what you are needing to create.
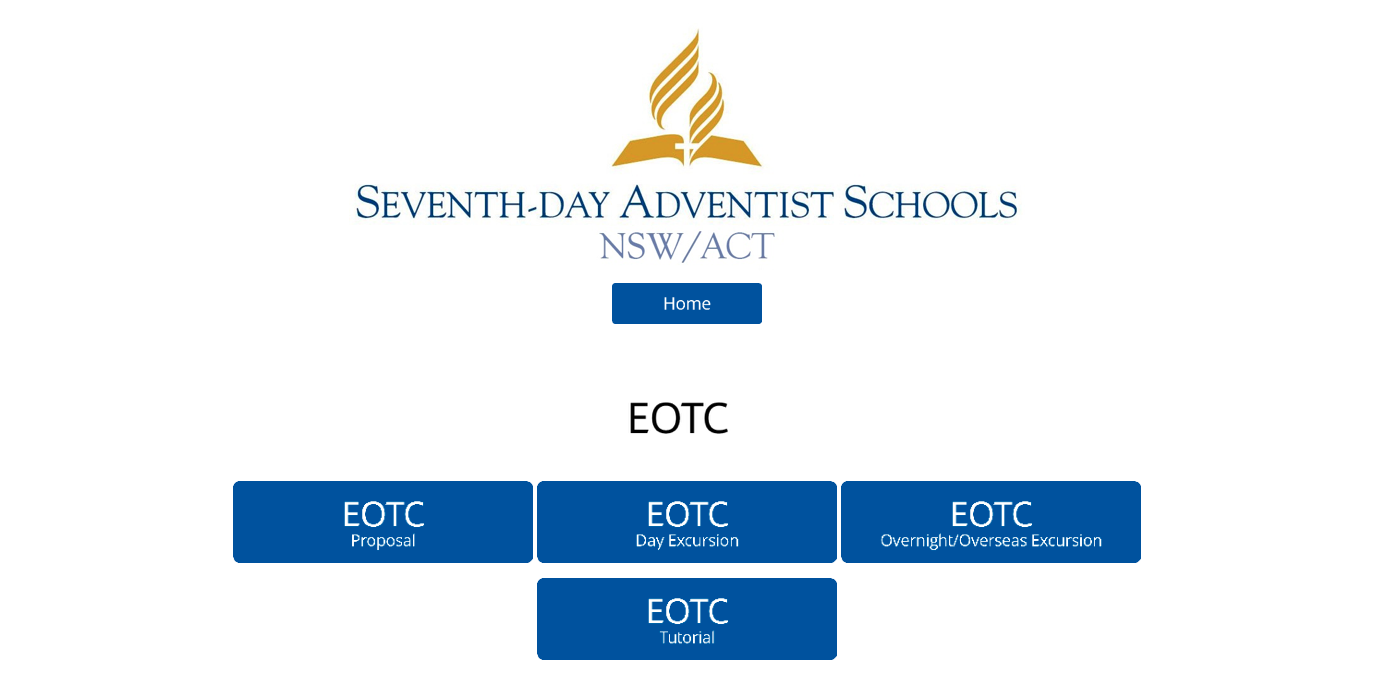 Image Removed
| Note |
|---|
|
EOTC Proposal is a pre approval form for excursions and not the EOTC form required. Not all schools use this in EOTC procedures. If you are unsure check with your principal or head of school. |
| Widget Connector |
|---|
| width | 852 |
|---|
| url | https://www.youtube.com/watch?v=9SZCuAuECGg&list=PLNwRMtg_E51oVpyMJSoaazV_WqP8veDoi&index=18 |
|---|
| height | 480 |
|---|
|
back to top
| Anchor |
|---|
eotcproposal | eotcproposal | EOTC ProposalYou will need to complete as field in this form, apart from the one labeled *optional, and the press Save
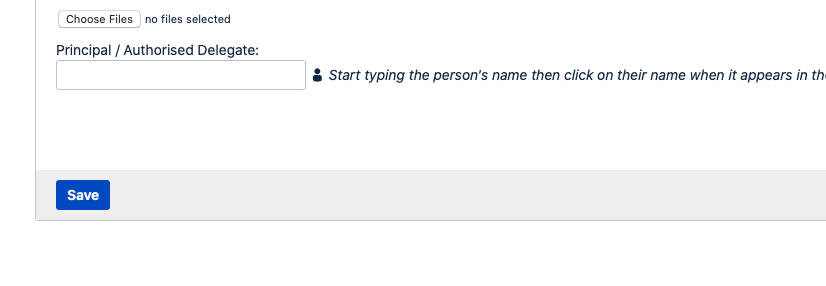 Image Removed
This will trigger an email to your principal/authorised delegate about your proposed excursion. While you are waiting for your approval you can start the EOTC Day or Overnight excursion form.
back to top
| Anchor |
|---|
eotcday | eotcday | EOTC Day/Overnight/Overseas ExcursionComplete the form as per the following guide and the information on the note. Please note only fill in the Red Questions only on this form and read the information regarding the names of the documents being upload in order for your form to work smoothly.
| Widget Connector |
|---|
| width | 852 |
|---|
| url | https://www.youtube.com/watch?v=gZyLfX1gzaA |
|---|
| height | 480 |
|---|
|
back to top
| Anchor |
|---|
eotcedit | eotcedit | Continuing/Editing/Approving an EOTCTo add to/edit/approve an EOTC in the system you will need to head to form results in you school page.
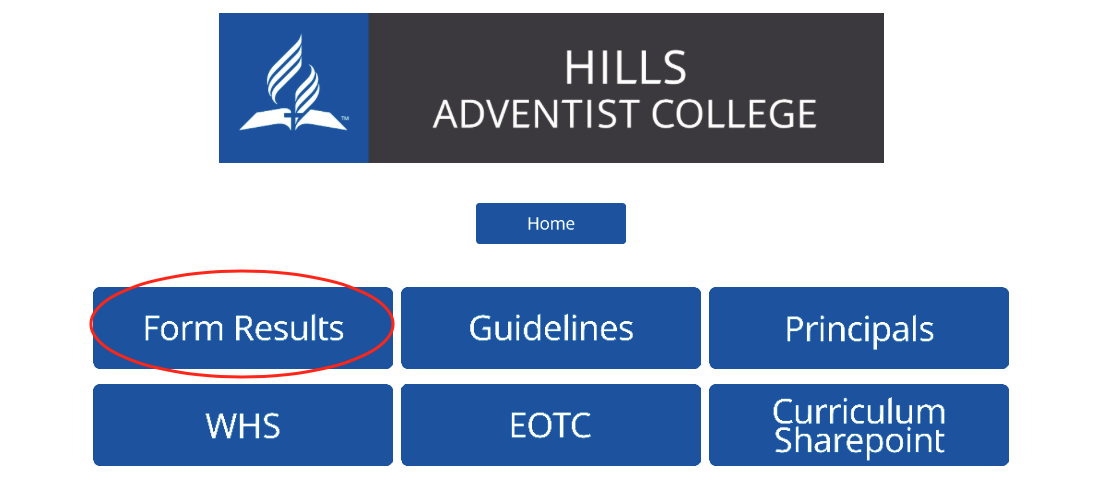 Image Removed
Then select the EOTC Trip Proposal, to approve a proposal, or EOTC Trip Submission to add to/edit/approve an EOTC
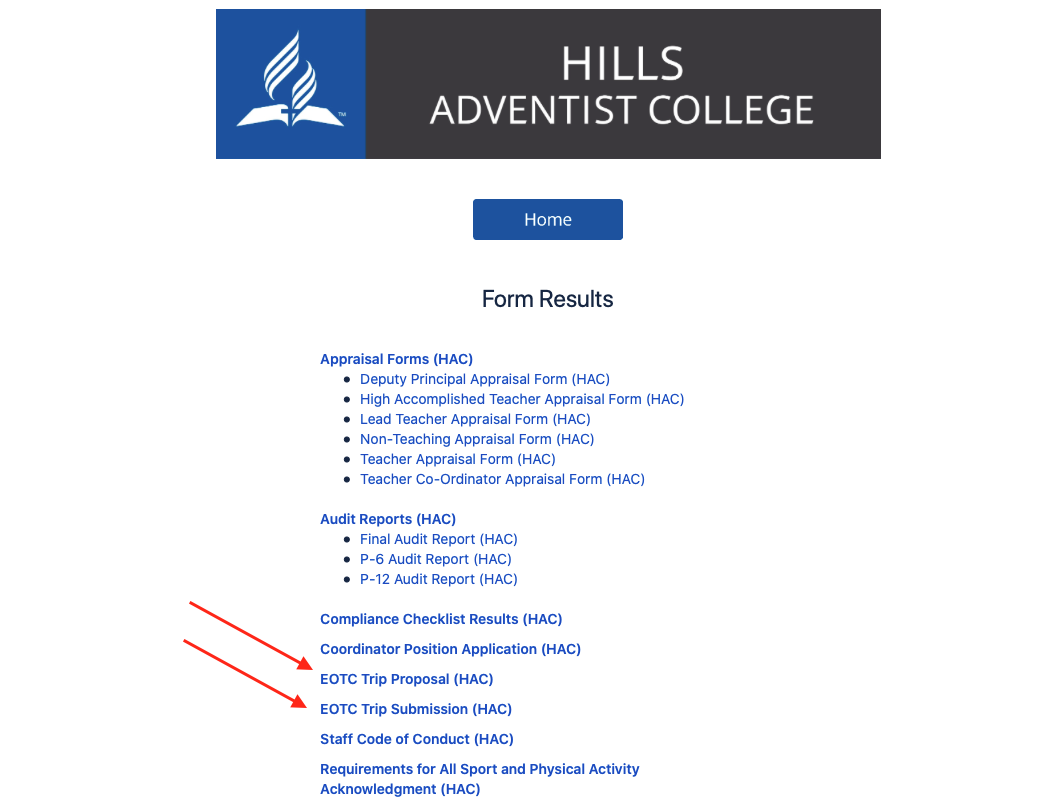 Image Removed
Once there follow the step in the video below about accessing and editing an EOTC.
| Widget Connector |
|---|
| width | 852 |
|---|
| url | https://www.youtube.com/watch?v=AMgl6e3bJxY |
|---|
| height | 480 |
|---|
|
back to top